And while we do not celebrate Halloween and tend to stay inside the evenings surrounding it (people egg things in NYC on Halloween- no thanks) I did make one concession. I don't think it's a bad one either.
In an effort to enjoy the peanut-buttery goodness of the Halloween holiday (the only part I will partake in), I decided to surprise Tom with homemade Reeses' cup bars. I found the website on Pinterest, and followed the pin here. And then browsed around for along time before I had to close the browser or go buy cookies from the Hot 'N Tasty downstairs. And they have horrible cookies, so I my day would've been ruined if I hadn't pulled myself away from temptation.
I have fallen in love with Pepperplate- the web version and the app. So don't mind me if all my recipe's are copied from recipe on there. But to get the exact same recipe, click the link below. I didn't change anything, didn't need to :)
From Jen's Favorite Cookies:
WEB
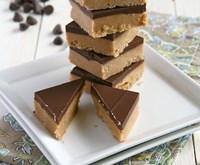
Peanut Butter Bars (No Bake!)
An easy no-bake recipe for peanut butter bars with chocolate frosting.
INGREDIENTS
Bars
- 2 cups graham cracker crumbs
- 2 cups powdered sugar
- 1 cup butter
- 1 cup peanut butter
Frosting
- 1 1/2 cups chocolate chips
- 1/4 cup peanut butter
INSTRUCTIONS
- In a bowl, melt butter and peanut butter together.
- Add cracker crumbs, sugar, butter, and peanut butter. Spread mixture evenly into a 9×13 pan.
- Melt chocolate chips with peanut butter in 30 second intervals in the microwave, stirring between each, until melted and smooth.
- Pour chocolate mixture over bars, and frost evenly.
- Chill for 40-50 minutes until chocolate is set.
NOTES
Oct 31 2013.
     Best cut and served straight out of the fridge (or they are too soft and get messy) and cut into 1-inch squares and popped into your mouth. They are very sweet for more than a cube or two at a time.
And we loved it! The pics show our results.

Despite them kinda being a pain to cut out of the pan, they did kind of make squares, although I wouldn't compare them to the photos from the original post. I could hardly contain myself. Big surprise.
 |
| Inspiration. |
 |
| Reality. |
Shoulda melted the chocolate more. Coulda took my time cutting. Woulda gotten better photos.
Whatever, they were amazing and I stand by the original recipe and vouch against myself. Bad blogger. Why don't I try harder to get nice photos. Because.... I was about to pop that lil broken piece into my mouth and forced myself to stick it back where it belongs for the photo. You're welcome...
And when I did, it was amazing!
BUT:
We did find (in the final row of the pan of course) that the best way to cut and enjoy them were to cut mini cubes and pop em in your mouth.
And try not to let them get room temperature. Because they tend to soften up- and as much as I love eating candy like a kid on Halloween, I don't want to look like a kid who ate candy on Halloween.
No comments:
Post a Comment